Products
Training
Training
What are the key steps of setting-up and commissioning an Aerona³ air source heat pump?
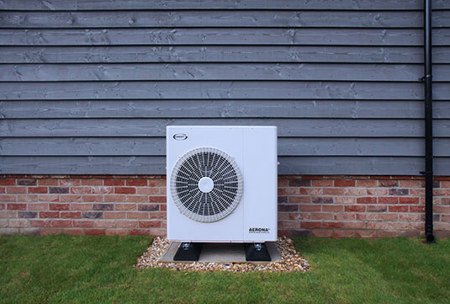
The set up and commissioning of a Grant Aerona³ air source heat pump is done via a Grant heat pump controller, either the Aerona Remote Controller or Aerona Smart Controller, depending on which type of controller has been installed. The Remote Controller is a white cased wall mounted LCD display controller whereas the Aerona Smart Controller, which is also wall mounted, has a black casing and 4.5” colour touchscreen display. It is important that you follow the correct instructions for the heat pump set-up and commissioning according to the type of heat pump controller fitted.
Quick links for this Article…
In this article, we will explain:
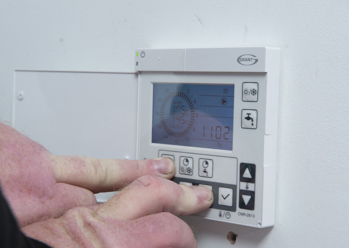
Pictured below is the Aerona Remote Controller.
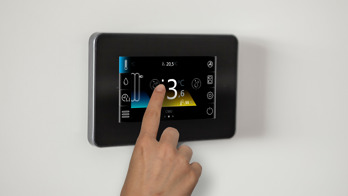
Pictured below is the Aerona Smart Controller.
Heat pump setup with the Aerona Remote Controller
If you have installed an Aerona³ R32 heat pump with the Aerona Remote Controller, you will use the controller to complete the heat pump set-up and commissioning. Provided below is an outline summary of the steps involved but please ensure you refer to the Installation Manual that has been supplied with the heat pump.
- Turn on the heat pump via the controller and then set the date and time
- Ensure the system has been filled to the correct pressure and any air removed from the heat emitter circuit
- Check the pressure when the system is cold – this should read around 0.5bar for a bungalow and 1bar for a two-storey house
- On the terminal PCB (located on the heat pump), ensure that the dip switch 4 is in the off/down position and then press the ‘pump switch’ on the PCB – at this point, the circulating pump will start operating, releasing any air from the water circuit (the pump should be allowed to run for ten minutes, after which the pump will automatically switch off)
- Next, check the heat pump control parameters on the Remote Controller and adjust these as required to suit the system design requirements – a full list of the parameter codes can be found in the Aerona³ Heat Pump Installation Manual
- The other control parameters also need to be checked, located in the ‘Installer Level’ of the Remote Controller, and adjusted accordingly
- Review the domestic hot water control parameters which can be accessed via the ‘Service Level’ of the Remote Controller (watch our video here to learn more about this ‘Service Level’)
- If any system controls for space heating and hot water are connected to the system, these need to be adjusted to suit the system requirements – this includes any programmers, room and cylinder thermostats and any anti-legionella controls
- Finally, set the circulating pump output using the dip switches on the terminal PCB, check any automatic bypass is set correctly, and balance the emitter circuit.
You can read more about the Aerona Remote Controller by referring to the Installation Manual for the Grant Aerona³ Air Source Heat Pump range which you can download and view via Customer Support Centre for Heating Professionals.
Heat pump setup with the Aerona Smart Controller
If you have installed an Aerona³ R32 heat pump with the Aerona Smart Controller, the set-up and commissioning of the heat pump will be completed via the controller’s touchscreen display. A summary of the steps is outlined below but please refer to the Installation Manual for detailed guidance.
- Turn on the Aerona Smart Controller – if you are doing this for the first time after installation, you will need to follow the instructions on-screen to set the language, date and time.
- The system configuration creator screen will then appear followed by a series of prompts – you will need to respond to each prompt by selecting the preferred option using the touchscreen. (The System Configuration Assistant can also be accessed via the ‘settings’ icon in the bottom left hand side of the home screen – select ‘service settings’, enter the 4-digit password of 0000 and then select ‘enter’.)
a. Select whether the system includes a buffer, low loss header or is a direct system
b. Confirm whether there is a facility for domestic hot water and, if so, whether a secondary hot water circulation pump is installed
c. Confirm if an outside temperature sensor is connected and, if so, select 'Smart Controller' option. Note: If an outside temperature sensor has not been installed, you will only be able to configure fixed water temperature control for the heating circuit(s)
d. Configure your heating circuits, starting with Circuit 1 (which has no mixer facility), renaming the circuit if you wish and then choosing the heat emitters that you are using for this circuit. You can also select whether you require a fixed temperature or weather compensation – by selecting ‘weather’, you will then be able to adjust the heating curve
e. Complete the hydraulic configuration, confirming the decrease in set point temperature (this is your drop in water flow temperature at night time or during unoccupied periods)
f. Select your circuit thermostat choice, such as wired or wireless thermostats or the control panel
g. Review the summary screen which displays at the end of configuration process
h. If you need to set up further/adjustable circuits (for example for underfloor heating), follow the on-screen prompt to set up additional circuits and repeat steps (d) to (g)
i. The adjustable circuits also have the ability to use a motorised mixing valve and, if selected, will need to have the valve opening times configured for the Aerona Smart Controller to accurately open and close the valve.
j. Once all of the circuits have been set up, you can then check the configured system by activating components via the manual control screen – please note, this simply turns components on and off and does not follow any protection logic
k. When running for the first time, the system configuration creator will also prompt you to setup and configure Wi-Fi connectivity to give remote access functionality to the Aerona Smart Controller from a web portal or the ecoNET24 mobile app. For further guidance on configuring the Wi-Fi, please watch our video here. - Review the summary screen to check that all the settings are correct and if they are, press the green tick to confirm – the Smart Controller will then return to the home screen, showing the setup is complete
- You must also set up the legionella protection separately using the Aerona Smart Controller – please watch our video here to learn more about this step
- Review the heat pump parameters - to access the heat pump parameters from the Smart Controller’s home screen, select the ‘settings’ icon in the bottom left hand corner, select ‘service settings’ and enter the 4-digit password 1234 and select ‘enter’. The heat pump parameter menu will then display and you can adjust these as required to suit the system design requirements – a full list of the parameter codes can be found in the Aerona³ Heat Pump Installation Manual.
You can read more about the Aerona Smart Controller by referring to the relevant installation instructions – please click here to download and view this heat pump controller manual.
Heat pump set-up video tutorials
To demonstrate what is involved with the set-up and commissioning of an Aerona³ air source heat pump using the Aerona Remote Controller, we have a video which talks through this stage of a heat pump installation – please press play below to view this video in full. A separate video is also available which demonstrates how to use the Aerona Smart Controller to set up an Aerona heat pump – please click here to watch.
Was this article useful?
Have more questions? Submit a request
Couldn't find what you were looking for?
Alternatively you can speak to a member of our team - Subject to Operating Times